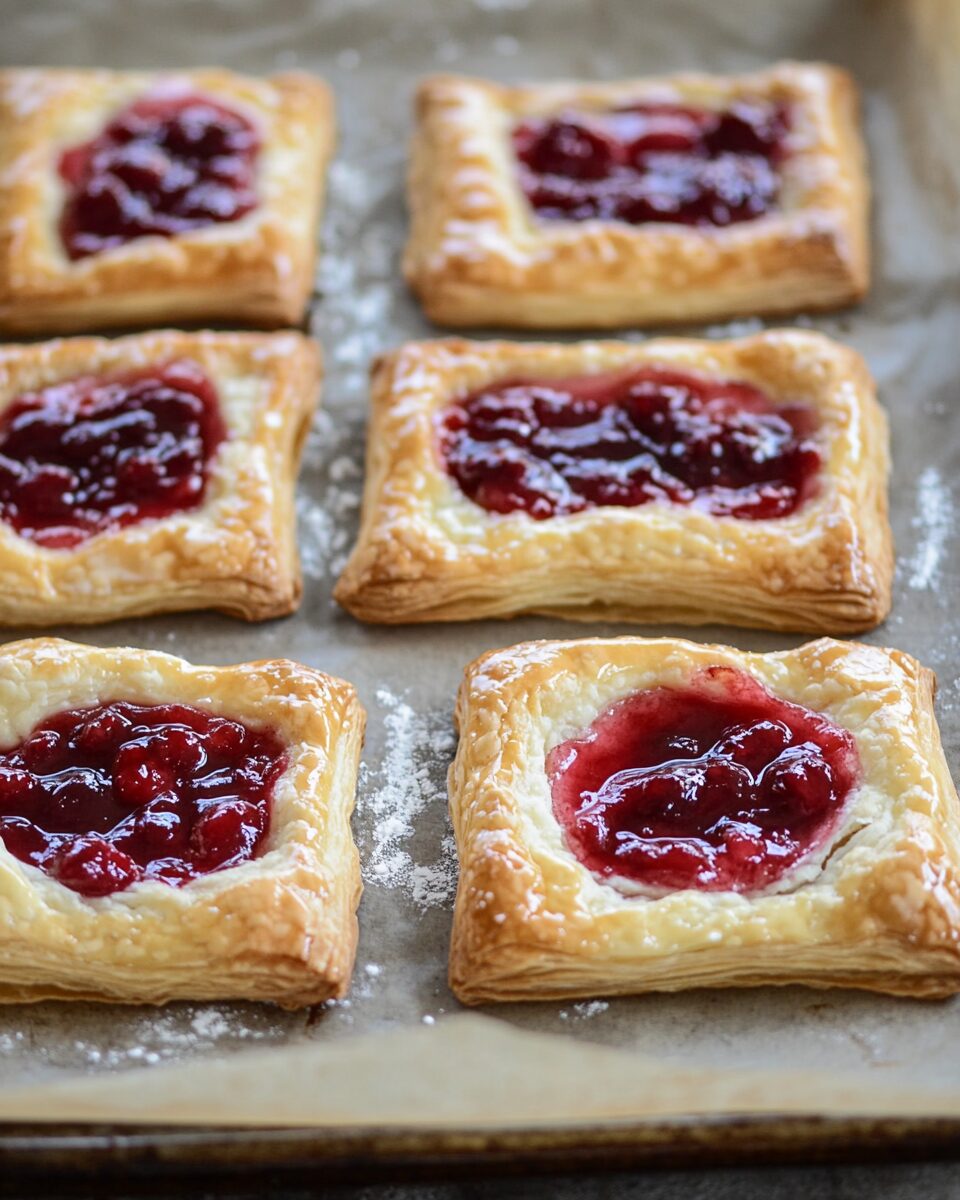
These Cherry Cream Cheese Danishes are the kind of treat that turns your kitchen into a cozy little bakery. With buttery, golden puff pastry, a rich cream cheese layer, and a vibrant cherry topping, they’re as pretty to look at as they are irresistible to eat. Topped with a silky vanilla glaze, every bite is a perfect mix of crisp, creamy, and sweet.
Whether you’re hosting brunch, treating your family, or just indulging in a weekend bake, these danishes are a go-to recipe for guaranteed smiles. Even better? They’re surprisingly easy to make just a few simple steps, and you’ll have dozen bakery-worthy pastries on your table in no time.
Full Recipe:
Ingredients:
For the Pastry:
-
2 sheets frozen puff pastry, thawed
-
8 oz cream cheese, softened
-
2 tablespoons granulated sugar
-
1 teaspoon vanilla extract
-
1/2 teaspoon almond extract
-
1 can cherry pie filling
For the Egg Wash:
-
1 large egg
-
1 tablespoon water
For the Glaze:
-
1/2 cup powdered sugar
-
2–3 teaspoons milk
-
1/4 teaspoon vanilla extract
Directions:
-
Preheat your oven to 400°F (200°C). Line two baking sheets with parchment paper.
-
On a lightly floured surface, unfold the puff pastry sheets. Cut each sheet into 6 rectangles (12 total).
-
Place the rectangles on baking sheets, leaving at least 1 inch between each.
-
Use a fork to poke holes in the center of each rectangle, leaving a ½-inch border untouched.
-
In a bowl, mix softened cream cheese, sugar, vanilla, and almond extract until smooth.
-
Spread 1 tablespoon of the cream cheese mixture in the center of each pastry.
-
Spoon 2 tablespoons of cherry pie filling over the cream cheese layer.
-
In a small bowl, beat the egg with water. Brush the edges of the pastry with the egg wash.
-
Bake for 15 minutes or until golden and puffed. Rotate pans halfway through baking.
-
Let pastries cool on a wire rack for 10–15 minutes.
-
Mix powdered sugar, milk, and vanilla to make the glaze. Drizzle over warm pastries.
-
Serve warm or at room temperature, with coffee or tea.
Prep Time: 10 minutes | Cooking Time: 15 minutes | Total Time: 25 minutes
Kcal: 280 kcal | Servings: 12 pastries
The Irresistible Charm of Cherry Cream Cheese Danish
Few pastries have the power to instantly elevate a breakfast table or brunch spread quite like the Cherry Cream Cheese Danish. A timeless combination of buttery puff pastry, rich cream cheese filling, and sweet-tart cherry topping, this bakery favorite is surprisingly easy to make at home and even more delightful to serve. Whether you’re preparing it for guests or simply treating yourself, the Cherry Cream Cheese Danish is a sweet indulgence that never disappoints.
At first glance, these pastries seem like something you’d find behind the glass of a high-end bakery. Their glossy finish, elegant layers, and bright cherry filling suggest hours of meticulous effort. But the real magic of this recipe lies in its accessibility with store-bought puff pastry and a few pantry staples, anyone can achieve stunning, professional-looking results without breaking a sweat.
Why We Love This Danish So Much
The appeal of the Cherry Cream Cheese Danish lies in its perfect harmony of textures and flavors. The puff pastry offers that irresistible flakiness and delicate crunch, which contrasts beautifully with the smooth, tangy cream cheese center. On top, the cherries add a burst of juicy sweetness, while a drizzle of glaze ties everything together with a light touch of sugary elegance.
But beyond its taste and texture, this pastry is also beloved for its versatility. It fits in just about anywhere from a cozy weekend breakfast in bed to a potluck brunch, afternoon tea, or a sweet ending to a dinner party. It’s elegant enough for special occasions, yet simple enough to whip up on a lazy Saturday morning.
A Brief History of the Danish
The “Danish” as we know it actually has its roots in Vienna. During a 19th-century strike, Danish bakers hired Austrian workers to fill in, and those bakers introduced laminated dough techniques the same used for croissants and puff pastry. Over time, these techniques evolved in Danish bakeries to include fillings like fruit, custard, and cream cheese. The cherry and cream cheese combination became particularly popular in the United States, where it’s now considered a staple in cafes and bakeries across the country.
While traditional Danish pastry dough requires multiple rounds of folding and chilling, today’s version often uses pre-made puff pastry to make the process more approachable. This shortcut doesn’t compromise flavor in fact, many home bakers appreciate the ability to create something beautiful and delicious without dedicating an entire day to the dough-making process.
Pro Tips for Making the Best Cherry Cream Cheese Danish
Even though this recipe is straightforward, a few pro tips can make all the difference in achieving that bakery-worthy result:
-
Keep the puff pastry cold: Puff pastry needs to stay chilled before it hits the oven. If it becomes too warm, the butter layers may melt prematurely, resulting in a less flaky texture. Work quickly, and if needed, pop the pastry back into the fridge before baking.
-
Balance the cherry filling: While it’s tempting to overload your danish with cherry pie filling, too much moisture can cause the pastry to become soggy. Aim for a balanced amount of fruit and sauce to maintain the perfect texture.
-
Soften the cream cheese thoroughly: A smooth cream cheese filling is essential for the best texture. Make sure your cream cheese is fully softened at room temperature before mixing to avoid any lumps.
-
Egg wash for shine: Don’t skip the egg wash it gives your pastries that golden, glossy look that makes them so appealing.
-
Drizzle when warm, not hot: For the glaze, wait until the pastries have cooled slightly before drizzling. If they’re too hot, the glaze will melt right off; too cool, and it won’t adhere properly.
Serving Suggestions
The Cherry Cream Cheese Danish is incredibly flexible when it comes to serving. Here are a few of our favorite ways to enjoy it:
-
With your morning coffee or tea: There’s nothing like the pairing of a warm Danish and a hot cup of coffee or Earl Grey tea. The slightly tart cherry and tangy cream cheese cut through the bitterness of the coffee beautifully.
-
As part of a brunch buffet: Pair it with other pastries, fresh fruit, scrambled eggs, and juice for a well-rounded, crowd-pleasing spread.
-
For dessert: These pastries can easily double as a dessert, especially when warmed slightly and served with a scoop of vanilla ice cream or a dollop of whipped cream.
-
Gift or potluck offering: Because they travel well and can be served at room temperature, these Danishes make excellent treats for neighbors, coworkers, or gatherings.
Variations to Explore
One of the great things about this recipe is how easily it can be adapted to suit different preferences and seasons. Here are a few fun variations to try:
-
Blueberry or raspberry filling: Swap the cherry pie filling for other fruits to create a new flavor profile. Blueberries pair particularly well with lemon zest added to the cream cheese.
-
Apple-cinnamon: Use spiced apple pie filling and a sprinkle of cinnamon-sugar on top before baking for a fall twist.
-
Lemon curd: Replace the cherry filling with tart lemon curd for a zesty, tangy variation that’s especially refreshing in spring or summer.
-
Nut topping: Add a sprinkle of chopped pecans or almonds before baking for a bit of crunch and nutty richness.
-
Chocolate drizzle: Instead of the standard glaze, try drizzling the pastries with melted dark chocolate for an indulgent dessert.
How to Store and Reheat
To keep your Danishes tasting fresh, proper storage is key. Once fully cooled, they should be stored in an airtight container in the refrigerator for up to 5 days. While they can certainly be enjoyed cold, a quick warm-up makes them even more delightful.
For reheating, pop them into a preheated oven at 300°F for 5–8 minutes or microwave for about 15-20 seconds. Avoid overheating, especially in the microwave, to prevent the cream cheese from becoming rubbery.
If you’re making a big batch ahead of time, these pastries also freeze well. Wrap them tightly in plastic wrap and then foil, or place them in a freezer-safe container. They can be frozen for up to two months and thawed overnight in the fridge before reheating.
Conclusion: A Sweet Treat Worth Repeating
The Cherry Cream Cheese Danish isn’t just a recipe it’s an experience. From the way the pastry crisps and rises in the oven to the comforting scent that fills your kitchen, baking these little treats brings joy every step of the way. They’re the kind of pastry that feels fancy, yet achievable, indulgent yet not overly sweet, and perfectly suited to any occasion.
Whether you stick to the classic cherry version or experiment with your own fillings and toppings, the foundation of this Danish is a keeper. It invites creativity, rewards you with elegance, and delivers a melt-in-your-mouth moment with every bite. Once you try it, it’s sure to become a regular rotation in your kitchen because some things are just too good not to make again and again.